![]()


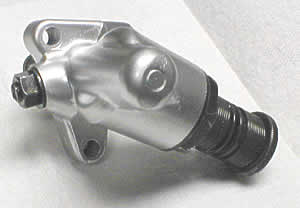
Cam Chain Tensioner Rebuild
Applies specifically to Suzuki GS850, and mostly applies to all other Suzuki GS models.
Will These Parts and Instructions Work On My GS?
The tensioner seal and o-rings do not appear on the fiches for most GS models, which is why I put together this page first place. Several years ago, someone on the GSR forum finally solved the mystery of the cam chain tensioner seals and found the correct Suzuki part numbers on some dusty, forgotten fiche for another model.
Soon after that, brave GSR forum members discovered that the same seal and o-rings were used in every GS model. I've had this page up for several years, and so far the o-ring and seal part numbers shown have worked for every '70s and '80s GS model from the lowly GS300 on up. At least, if they didn't work, no one has emailed to complain. (Later GS500 models use a tensioner with a different design, so it's pretty obvious that these instructions and parts don't apply.)
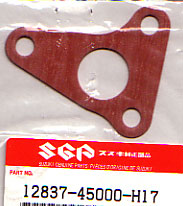
Obviously, the tensioner base gasket varies between models, but that appears on the fiches and is easily ordered. For the seal and o-rings, you just punch in the part numbers and order those sort of "blind". Trust me - it'll work! And as gambles go, $5 or $6 is pretty low-stakes.
I offer no guarantees as to what sort of confusion this will cause the parts monkeys at your local dealership. The descriptions for these part numbers won't seem to relate to the model or assembly. They will probably mutter darkly and curse you bitterly, but be firm. Start with a modest 20,000 volts setting on your cattle prod, and work your way up from there until they do as you ask.
You can also order using Suzuki part numbers at http://bikebandit.com , http://ronayers.com, http://partshark.com or any of the many other fine internet purveyors of Suzuki parts. Check the web site of your local Suzuki shoppe, too -- many now offer online ordering at a discount.
Tools, Parts, and Materials
![]()
Step 1
We start with the carburetors removed.
IMPORTANT: The engine should also be set to TDC (Top Dead Center) so that the cam chain can't skip time when the tensioner is removed.
Loosen the 12mm nut on the lockscrew. No need to take it all the way off yet.

Step 2
Now TIGHTEN the lock screw. The idea here is to keep the spring-loaded pushrod from kaboinging out when you remove the tensioner from the engine. Just sorta tight is fine -- no need for gorilla torque.
The locknut normally holds the setscrew about 1/4 to 1/2 turn away from the pushrod, which allows it to move enough to maintain tension on the cam chain, which is the whole point of having a spring loaded cam chain tensioner in the first place.
Notice grungy oil and grotty red sealer. Bleagh.

Step 3
Remove the tensioner mounting bolts. It might be easier to remove the top right bolt if you remove the #3 intake boot. If you're not working on a GS850, then things will look slightly different. Many tensioners only have two mounting bolts.

Step 4
While holding the pushrod in place, remove the locknut and setscrew.
Remove the pushrod and spring. Note the ramp at the end of the pushrod and the flat area for the setscrew.
Inspect the pushrod for any burrs or bending that would cause it to bind in the tensioner bore. With the spring and setscrew removed, make sure the pushrod moves freely in its bore.
Inspect the angled surface (ramped area) of the pushrod for dents or pits formed by the ball bearing on the end of the adjuster. These dents will cause the tensioner to hang up. You can sand or grind the ramped area flat (a piece of sandpaper stretched over a flat surface works) or order up a new pushrod. A new pushrod is available for most models, and isn't that expensive.
Remove the old crusty o-ring from the setscrew, if it hasn't crumbled already. Note the groove in the setscrew where the new o-ring sits.


Step 5
Lightly clamp the body of the tensioner in a vice. I have the plastic jaws installed to avoid gouging the tensioner more than necessary.
Remove the nut holding on the knurled knob.
The wrench will rotate the tensioner knob against the spring tension.
Once the nut breaks loose, allow the tensioner knob to go back to its relaxed position.
Don't let the knob pop off yet.

Step 6
Slowly pull the knurled knob off the adjuster shaft.
Note the relative positions of the small holes where the ends of the spring go. The adjuster knob can only go on two ways.
Count the number of turns of spring tension.
Mine had one turn of spring tension, and the holes were in line with one another.

Step 7
Using a 30mm deep-well socket, unscrew and remove the "cap nut" part of the adjuster assembly. This thing is usually VERY hard to remove after 25-30 years, so air impact tools may be needed.
If you can't manage to get this loose with reasonable amounts of force, STOP. Don't risk damaging anything. Just leave this part in place -- that o-ring isn't really what's leaking, and you can replace the seal with the shaft in place.
To remove the seal without removng the cap nut, you can use a small screwdriver to lever it out (be careful not to scratch the shaft or bore). You can also use a wood screw -- carefully drill a small hole in the body of the seal, then thread in a wood screw and use the screw to pop the seal out.
Note the location of the old, hard, squished o-ring.
Play with the mechanism until you grok how it works. That sounds vague, but it's easy to understand if you play with it, and very difficult to explain. If it helps, think of the tensioner as a mechanical one-way valve -- it can tighten the cam chain if needed, but it won't allow it to loosen. The pushrod can come out, but it can't go back in (unless you turn the knob.)

Step 8
Pull the adjuster shaft out of the large cap nut thingy.
Remove the old, nasty, hardened seal from the cap nut thingy.

Step 9: Reassembly and Rebirth
Once everything is apart, clean all the metal bits off in your favoite solvent.
I chose to strip the black paint off my tensioner and repaint it with a high-temp aluminum paint. Not that anyone would notice it buried under the carbs, but I'd know it was there.
This is also a good time to clean off the accumulated gunk and grime attracted to the oil leaking from your tensioner.
Finally, it would probably be a fantastic idea to obtain some stainless steel allen head bolts to replace the old mounting bolts.
Now that you're ready to reassemble, start by tapping the new oil seal into the large cap nut. An appropriately sized socket makes a nice driver.
Your seal from Suzuki will probably be black; the one I obtained from an industrial supplier is a little more colorful.
Coat the new seal with a few drops of oil.


Step 10
Install the pushrod and spring, then install the setscrew, washer, and locknut.
Leave the setscrew a little loose, but tight enough to retain the pushrod. No more than half a turn loose is fine.

Step 11
Install the large o-ring, lubed with a few drops of engine oil, onto the large cap nut.
Coat the adjuster shaft with a little oil, then place it through the cap nut and carefully guide it through the seal.
Screw the adjuster assembly into the tensioner body and tighten.

Step 12
Make sure the setscrew is loosened a bit so that the pushrod is all the way out.
Turn the adjuster shaft clockwise so that it's all the way in.
Place one end of the torsion spring into the hole in the large cap nut.
Wind the torsion spring 1 to 1.5 turns counter-clockwise, against the spring tension.
I used 1.5 turns -- the spring had 1 turn of tension when I disassembled it.
Holding everything in place with one hand, place the knurled knob in the correct position on the adjuster shaft while placing the end of the torsion spring into the small hole in the knob.
(Just try and take a picture while you're doing this. I dare ya.)
Once the knob is in the correct place, install the nut with LocTite. The LocTite is important -- your engine could be trashed if this nut comes off!


Step 13
To reset the tensioner to get it ready to install, press the pushrod in as far as it will go while turning the knob out (counterclockwise).
Hold the pushrod in place (you can let go of the knob) and tighten the setscrew.
Reinstall the tensioner on the bike, using your sparkly new stainless steel bolts and the new tensioner gasket.
With allen head bolts, it's much easier to reach the top right bolt. Remember, the top right bolt is 5mm shorter than the others.
Once the tensioner is installed, loosen the setscrew 1/4 to 1/2 turn -- until you hear the pushrod pop out to press against the tensioner blade.
Tighten the locknut while holding the setscrew in place. Remember, the whole idea is to keep the setscrew a little bit away from the pushrod so it can move. The setscrew is only all the way tight when you're removing or installing the tensioner.

Sparkly!